Table of Contents
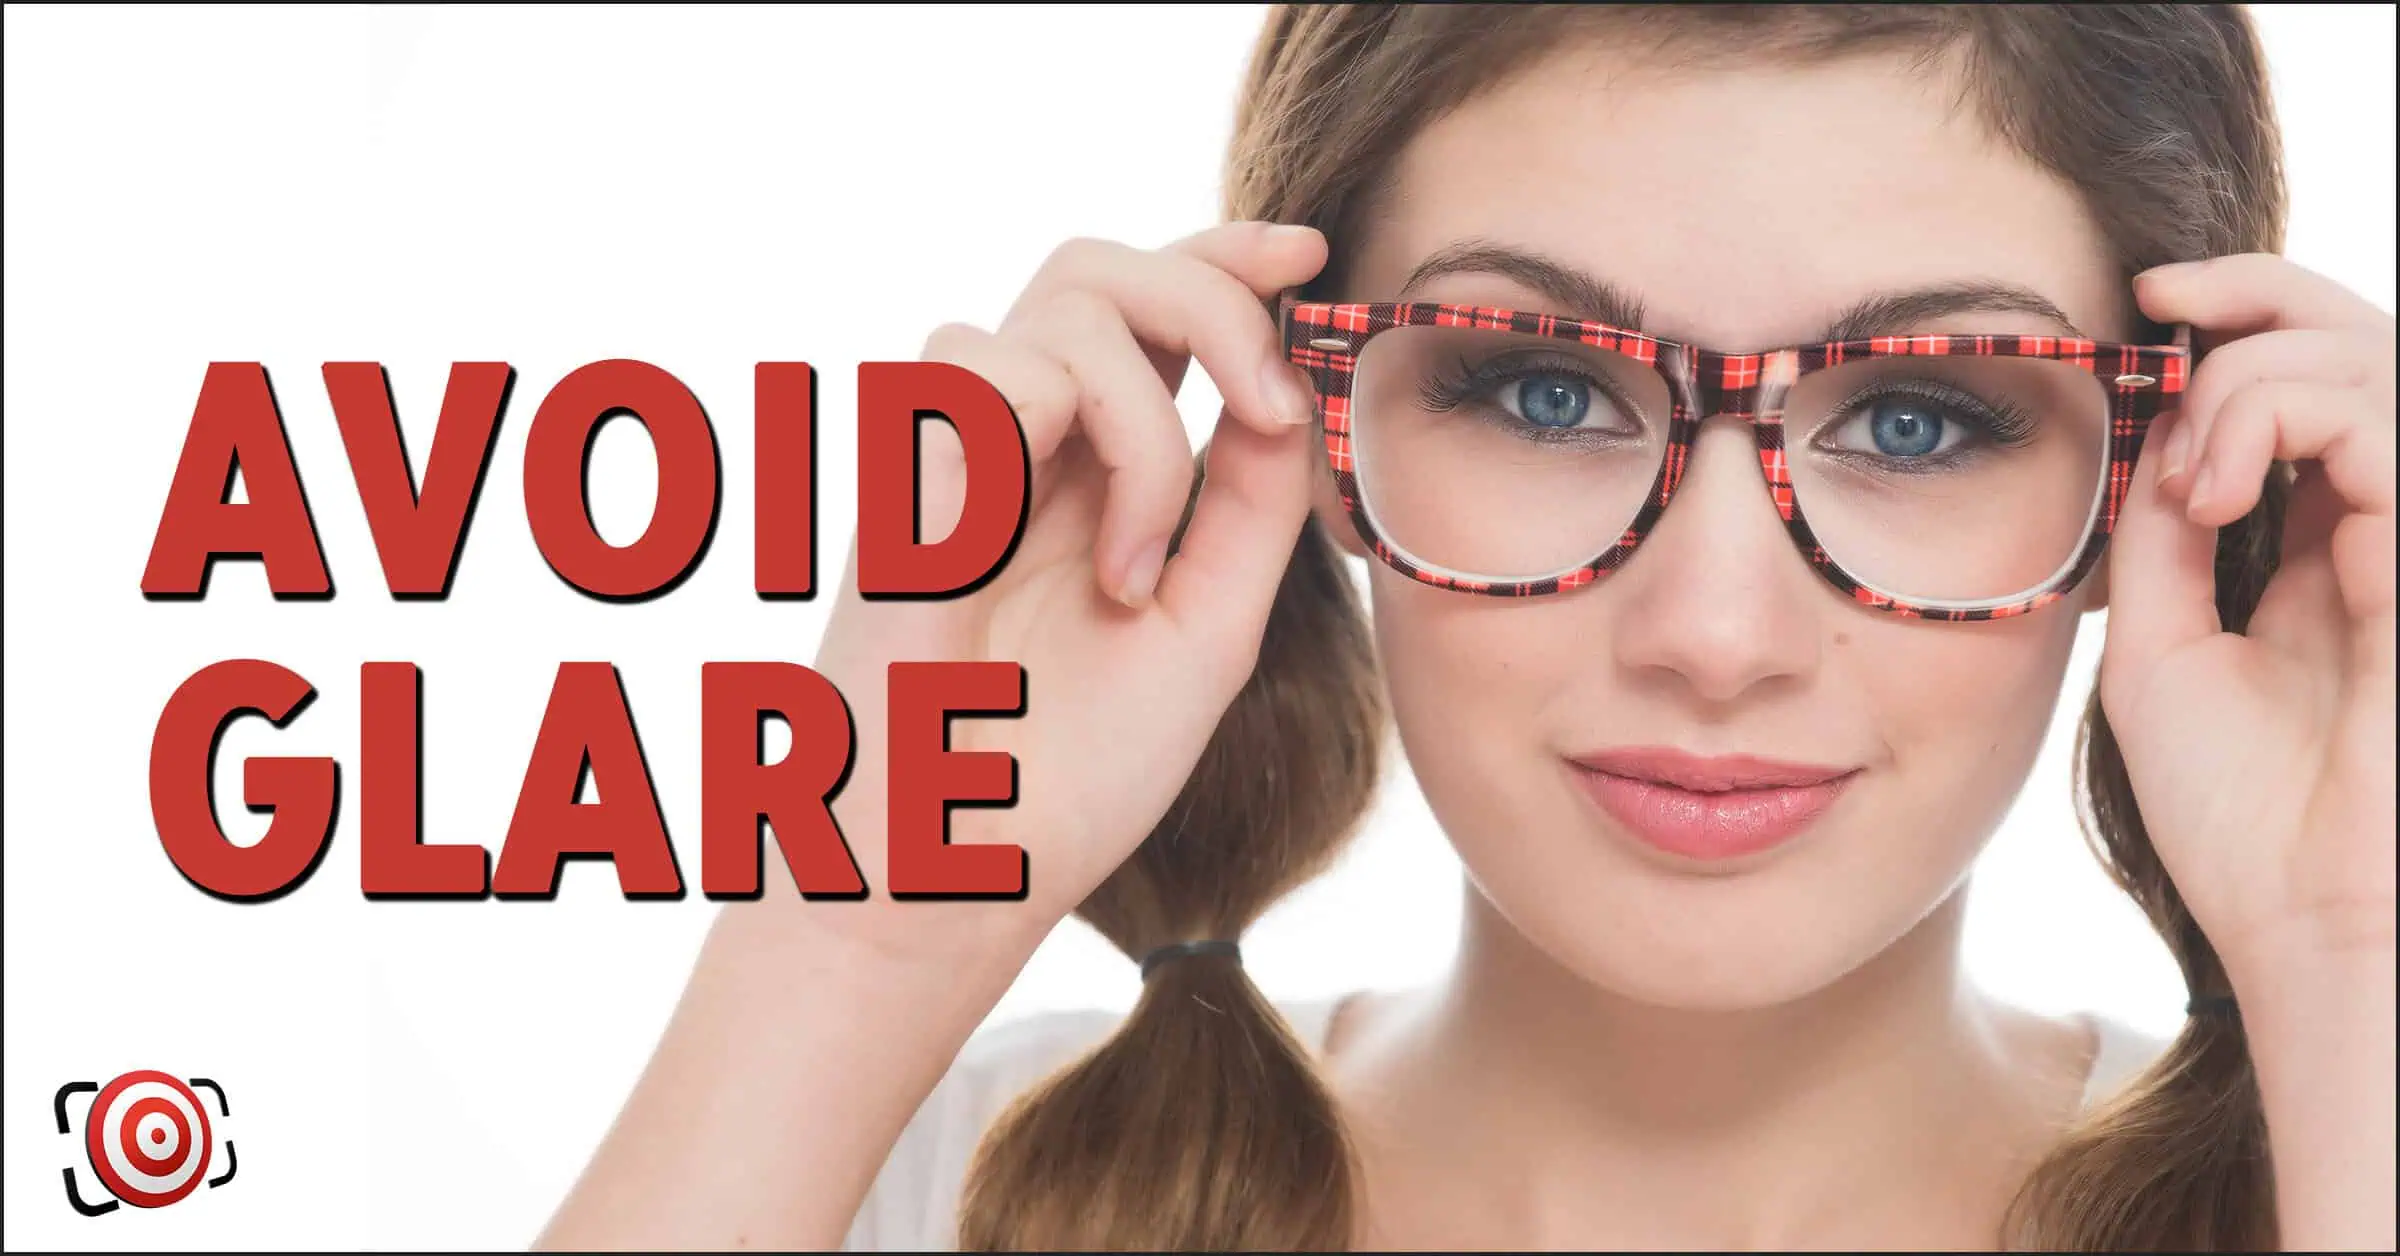
One of the most common questions I receive is: What’s the best lighting to use for photographing people with glasses so that there are no reflections or glare on the glasses?
The answer is easy—and I can use any kind of lighting arrangement I want. I just set my lights, take my test shots, and then make my subjects take off their glasses! Easy-peasy—problem solved!
Wait… Do you want to know how to do it with the glasses ON?
Well, in that case, let’s look at how to do it with an umbrella, a softbox, a beauty dish, and even a bounce flash. There are no crazy tricks—just a simple understanding of light.
Looking for a quick list of Dos and Don’ts? Click Here
Photographing people with glasses — especially in the studio can be a pain in the butt. You want to do cool lighting, but you don’t want to see reflections of your lights in the glasses. It doesn’t have to be that difficult, especially if you remember a simple piece of physics… the keyword being “simple.”
The challenge of photographing people with glasses is not new, and the best solution today is to understand how light works. In fact, this solution was available decades ago when I first learned about photographing people with glasses.
Throughout my career, I have encountered many photographers who think they have “tricks” for photographing people with glasses. The most common one is to tilt the glasses down, and honestly, that is the dumbest idea ever unless the person wears big, oversized glasses. The moment you start to tilt them down, physics guarantees that the top of the glasses will start to encroach on the top of the eyes and make the eyes seem smaller.
I have also seen people teach miracle Photoshop techniques that don’t really work that well. Honestly, you don’t want to waste time in Photoshop trying to fix glare on glasses.
Certainly, if your subject only wears glasses occasionally and is willing to remove them for the photograph, that solves your problem. Don’t be afraid to ask your subject if they would prefer to be photographed with the glasses on or off. Most people don’t wear glasses by choice, so you’re not going to offend the person if you ask politely.
Whatever you do, for the sake of your subject and your confidence, don’t go into the shoot afraid of the glasses. That will only lead your subject to lose confidence in you, and your nerves will get in the way of paying proper attention to your actions. It’s just one more simple challenge. Remember: all great photography is an act of problem-solving.
If it’s your first time and you don’t have experience photographing people with glasses, don’t hesitate to tell your client how important it is not to have glare and explain to them that you will test several lighting arrangements to get the best one for their glasses. Nobody will complain about that or think you don’t know what you’re doing.
It’s all in how you present it. Remember the 80 – 20 rule. When photographing people — 80% of your effort should be focused on psychology and your subject — 20% is the photography part. So, hopefully, it goes without saying that this is something worth practicing BEFORE you have a real subject or paying client in front of your camera.
The Physics
I mentioned the Angle of Incidence and the Angle of Reflection. We all understand that light basically travels in a straight line. For all of you hardcore science geeks, I know light travels in a wave pattern that has curves, but the net result is a straight line.
So, the angle at which a beam of light hits a reflective surface is called the Angle of Incidence. The Angle of Incidence determines the angle at which the light will reflect away from that surface — that’s called the Angle of Reflection. The Angle of Reflection will always be the same as the Angle of Incidence.
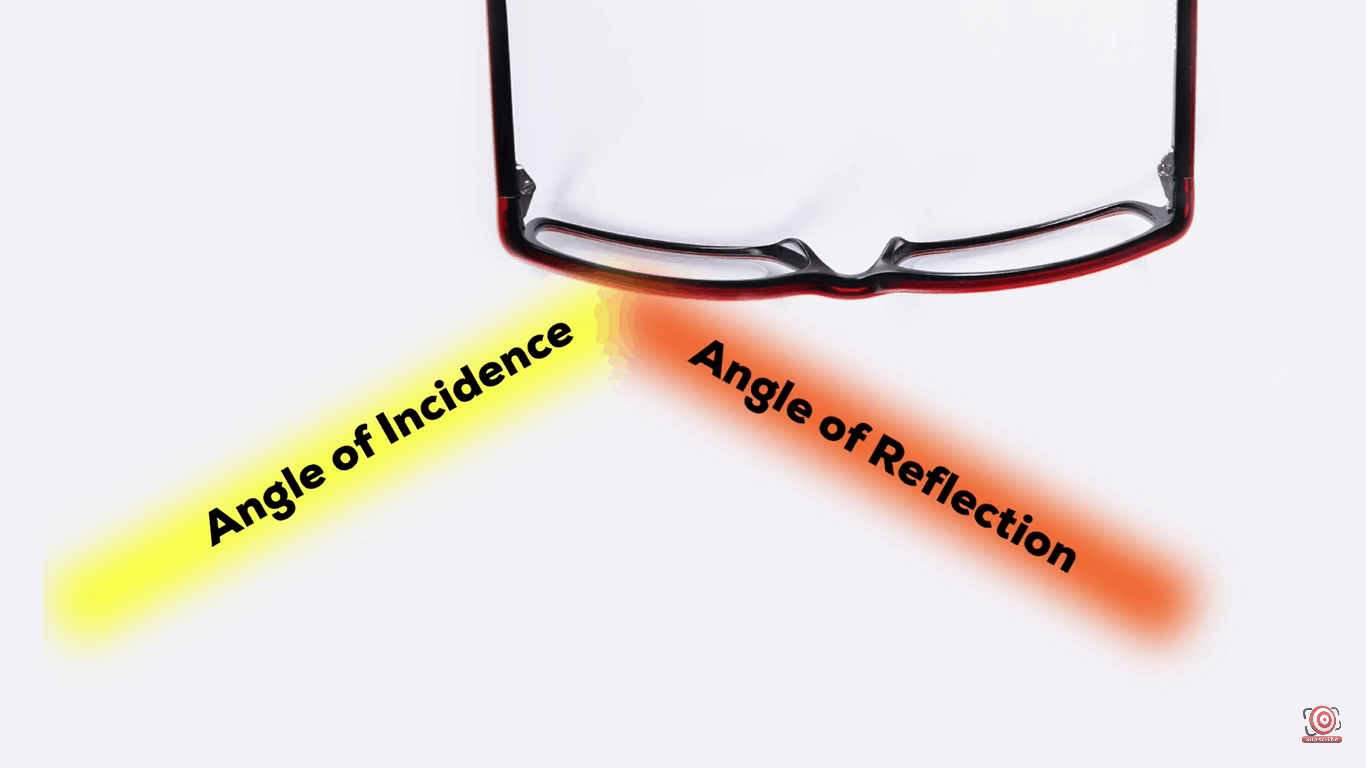
All of this means that light is fairly predictable, so as long as you remember this one simple rule of physics. You can always keep your camera out of the reflected light when photographing people with glasses.
Hopefully, you have already figured out that this little physics tidbit will help you with more than just glasses. Pretty much any reflective surface—mirrors, stainless steel, glass, windows—will reflect light the same way.
So, the solution is to make sure that the angle of the light hitting your subject is different from the angle at which you are photographing them so that the reflected light misses you completely.
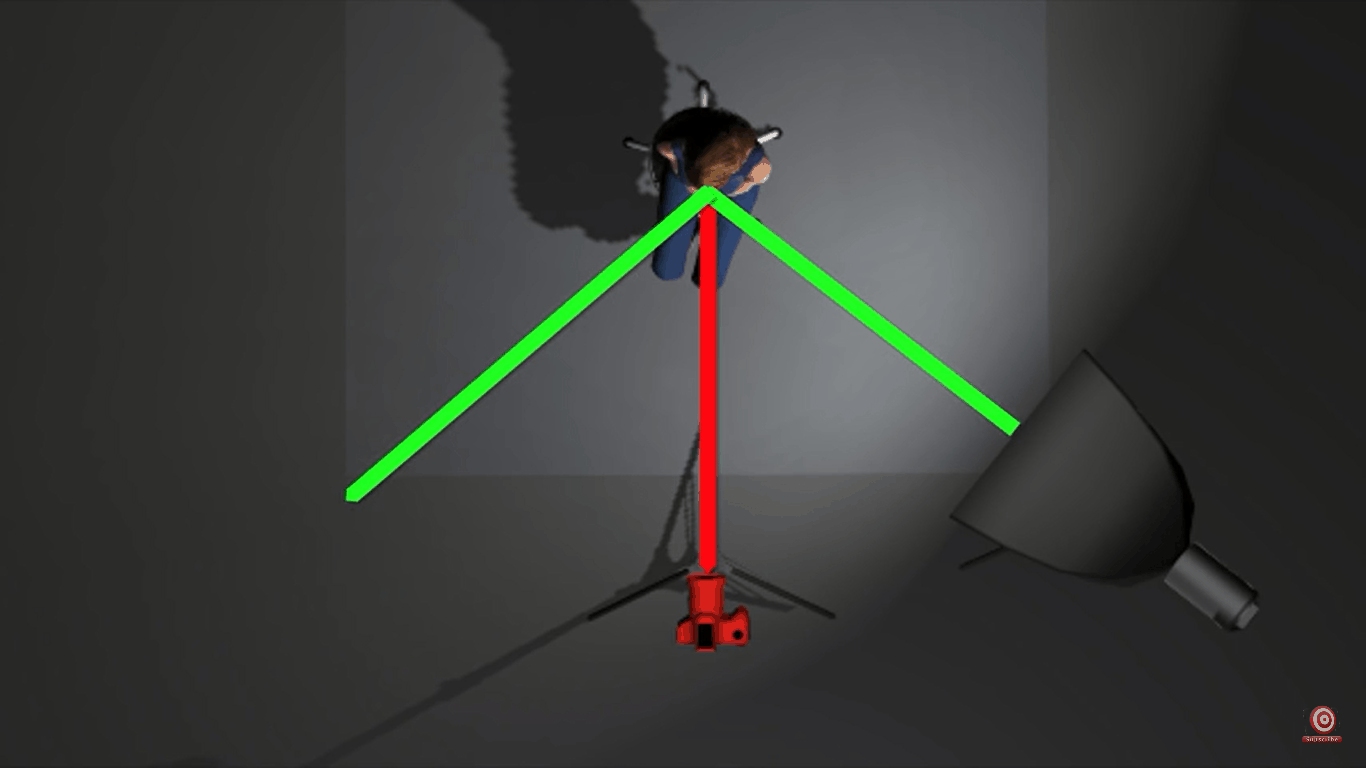
That sounds pretty simple, right? Actually, it is. The real challenge comes in the fact that most eyeglasses are not flat surfaces — they are curved — so when you are photographing people with glasses, you will have several angles of reflection for every light source.
How do we solve the problem without tricks and Photoshop?
One solution is to use broad lighting rather than short lighting. Broad light is when you light the side of the face that is closer to the camera.
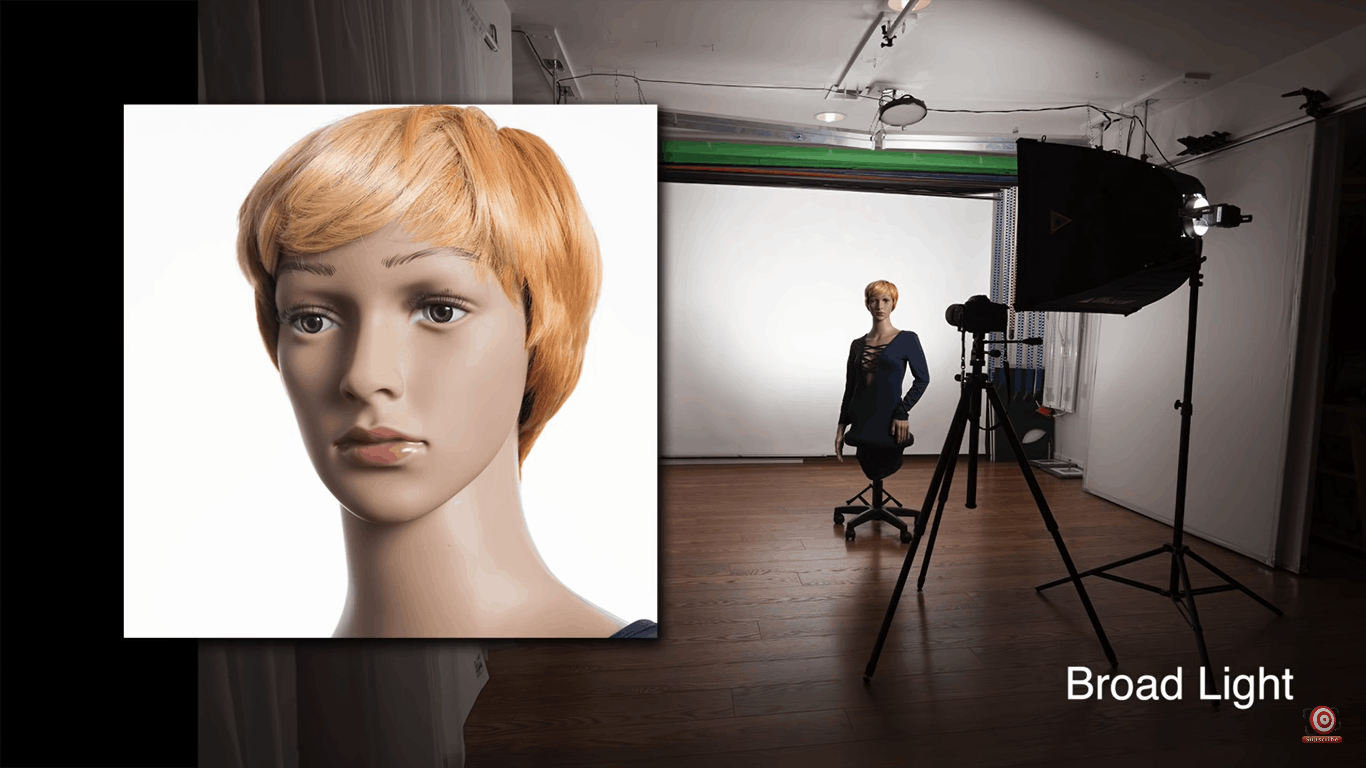
Short lighting is when you light the side of the face further from the camera.
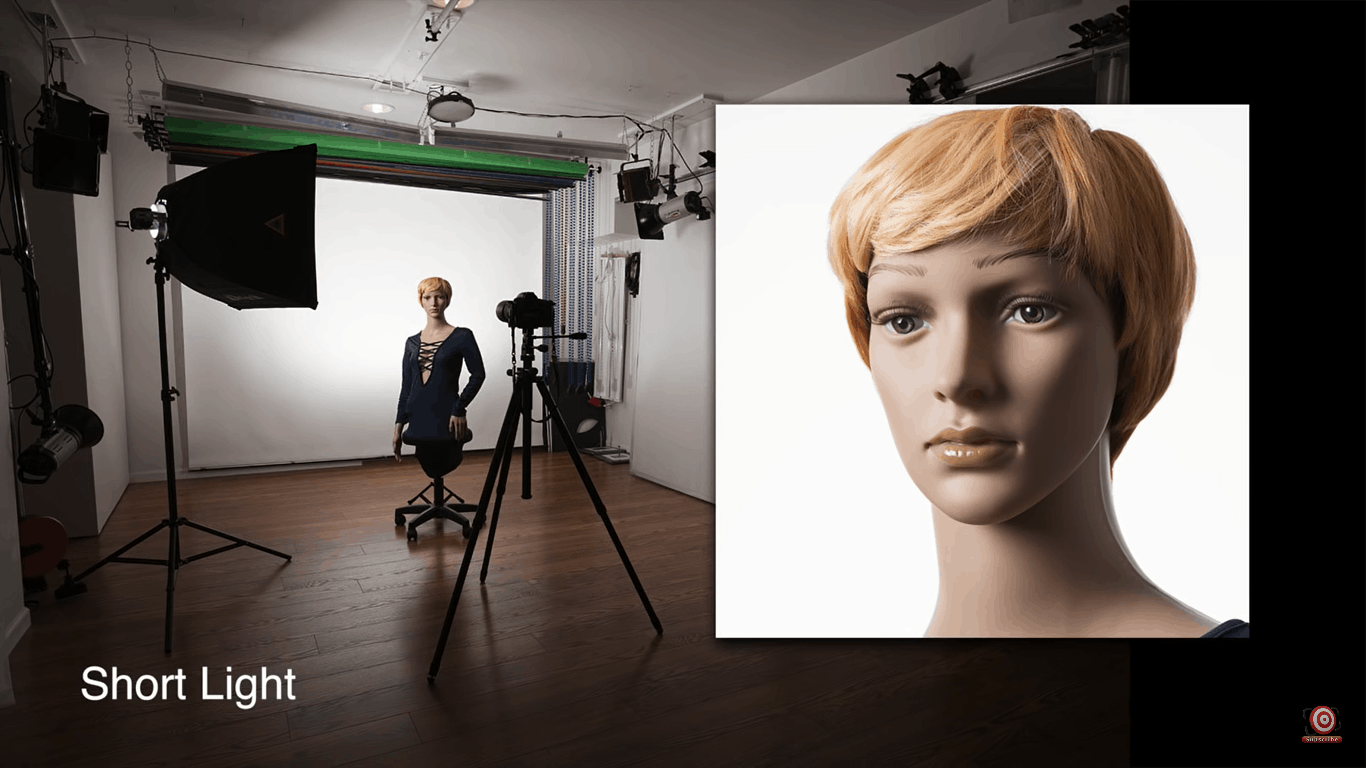
Broad lighting will generally have better results with eyeglasses because the angle of reflection is traveling away from you and your camera. Short lighting is much harder to use because it places your camera right in the path of the angle of reflection.
Now, if you are like me and you shoot lots of images straight on using the angles of incidence, I can place my light at a height that will cause the angle of reflection to miss my camera lens.
As you can see here, with the light right next to and just above the camera, I get a horrible reflection in the glasses.
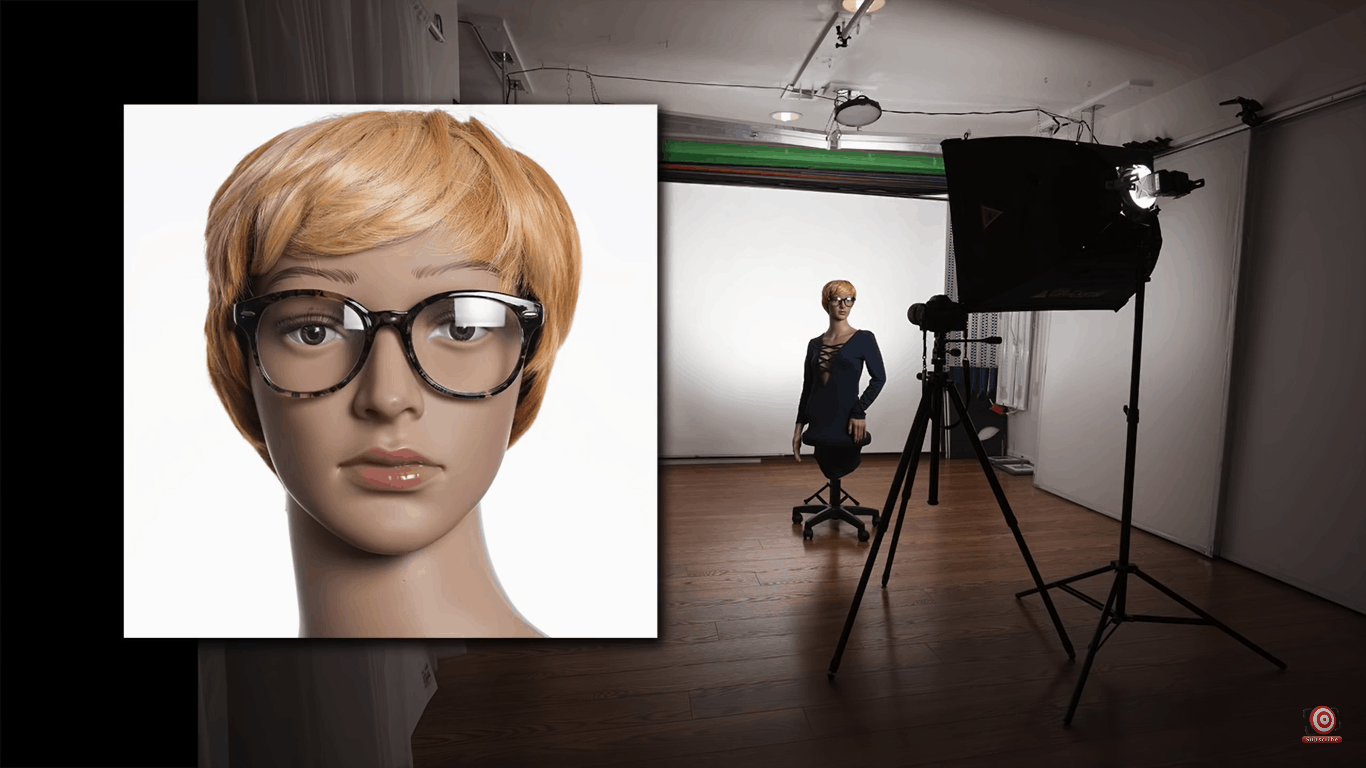
If I move the light much higher, the reflection is eliminated.
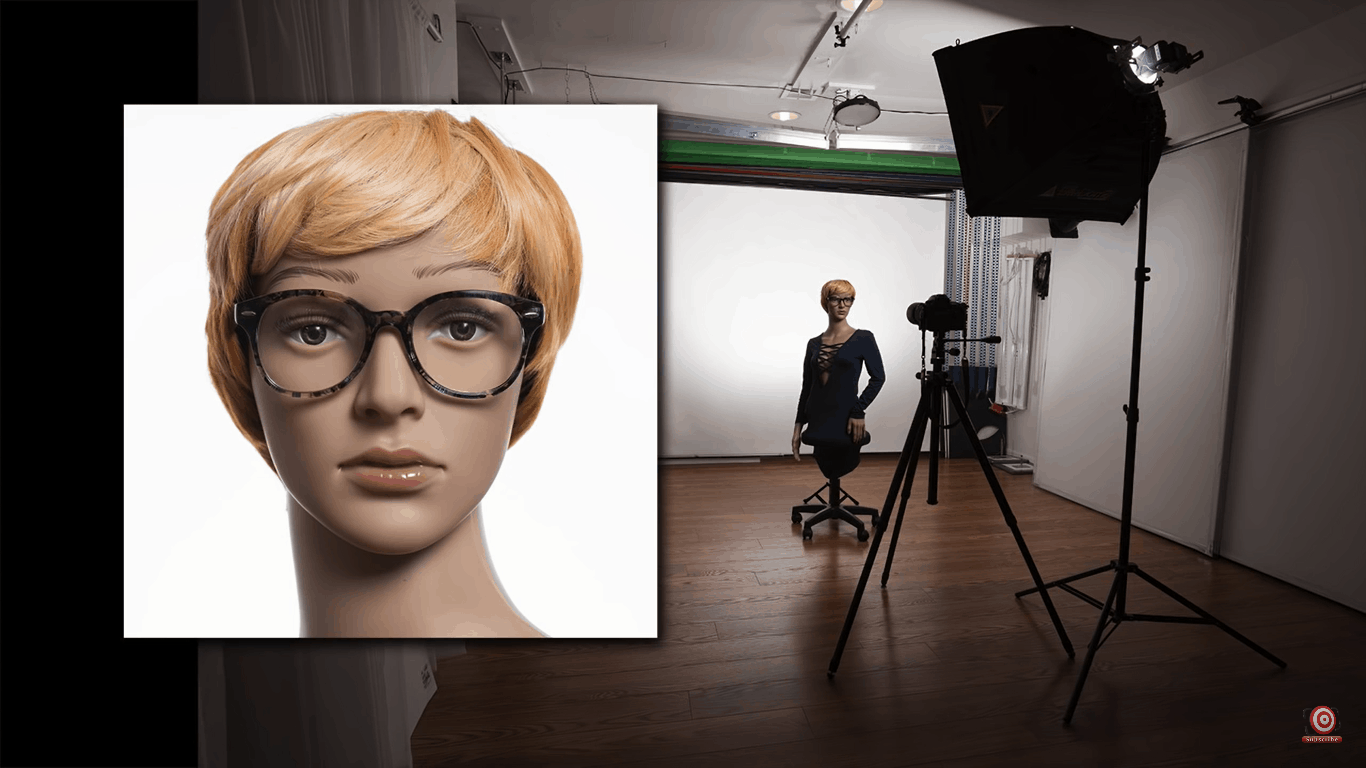
The same is true if I move the light more to the side for a dramatic effect.
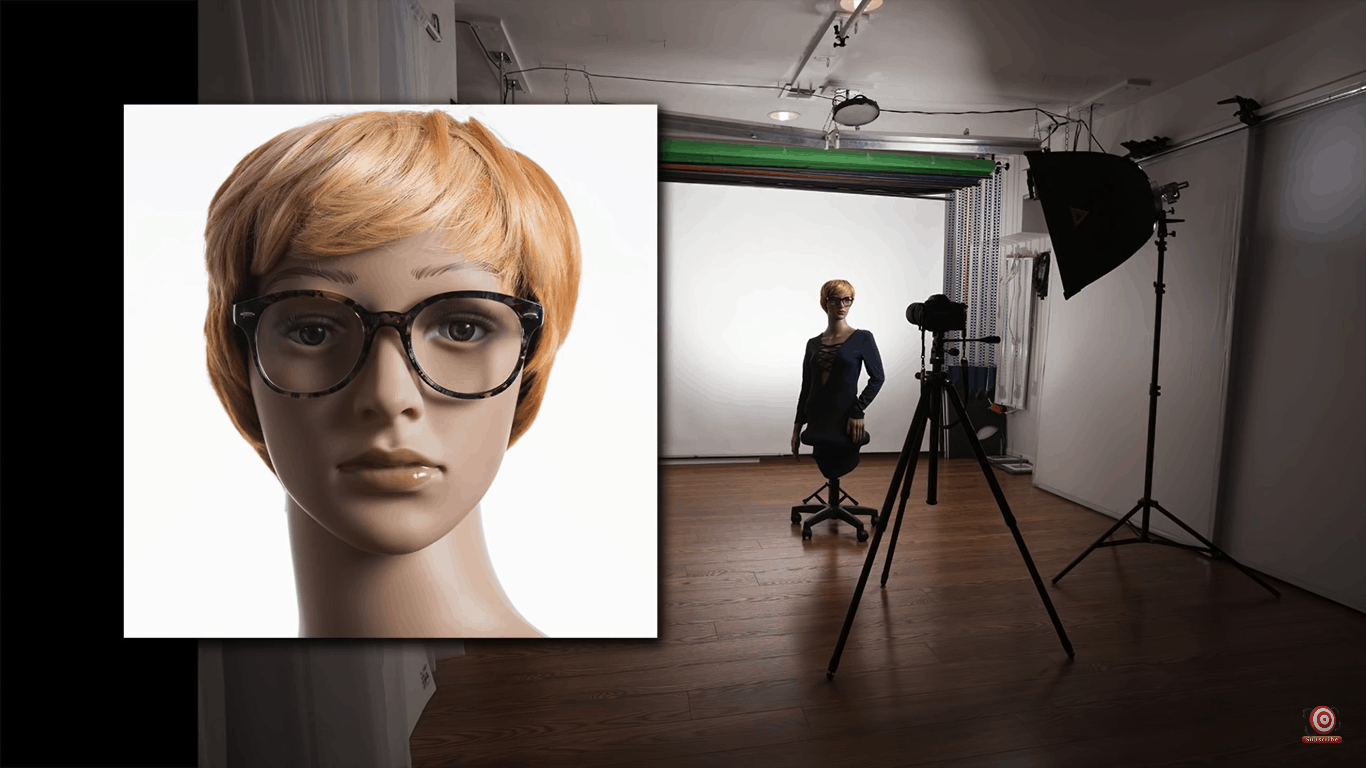
I can even add a second light using the same principles. Two lights next to the camera — two reflections. Move them high or move them wide, and the reflections will be gone.
What about Light Modifiers?
In this set-up, I have a LumoPro 180R speedlight with a LumoPro Umbrella set at about 55” high, just above my subject on the camera’s left.
For reference, there is also a second LumoPro 180R on a mini boom arm above and slightly behind my subject for a hair light. You can see that the reflections in the glasses are unacceptable.
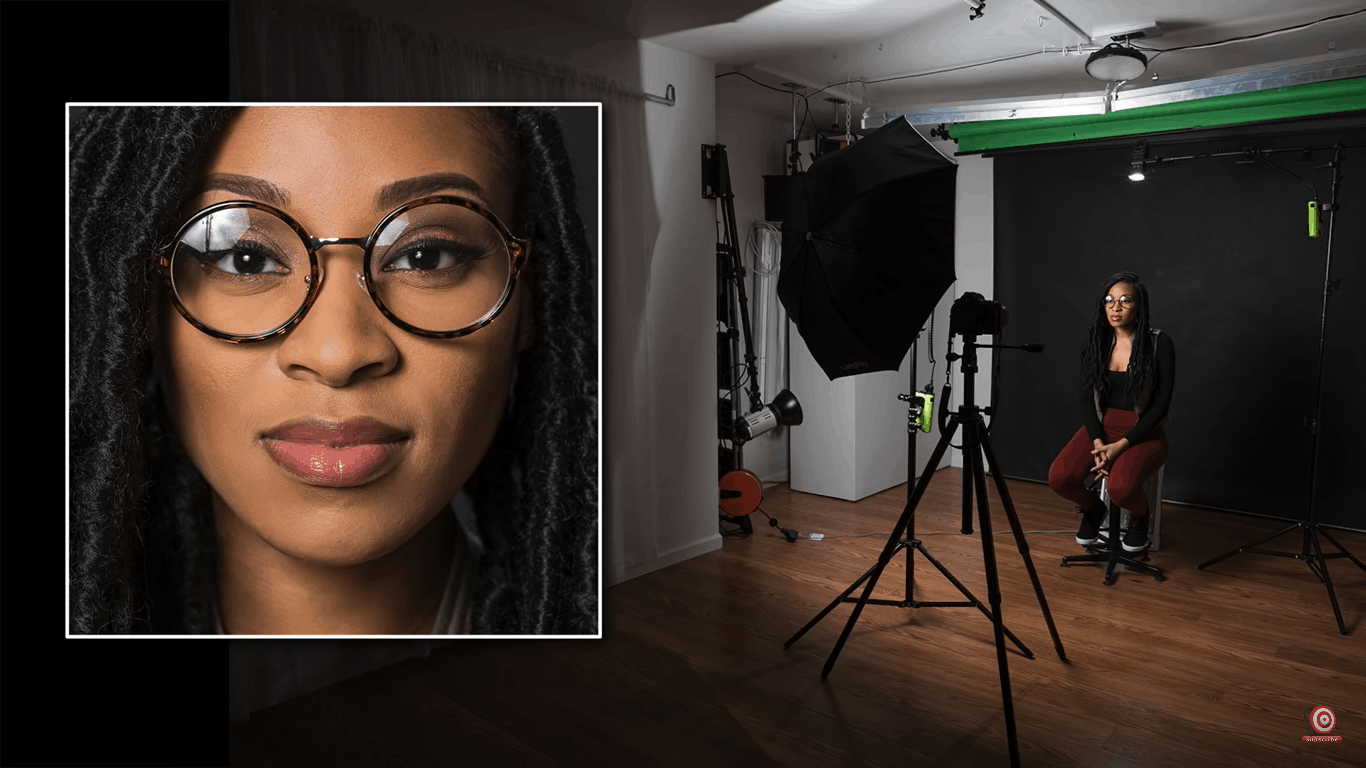
By moving the strobe up to 74” — I have eliminated the glare in the glasses.
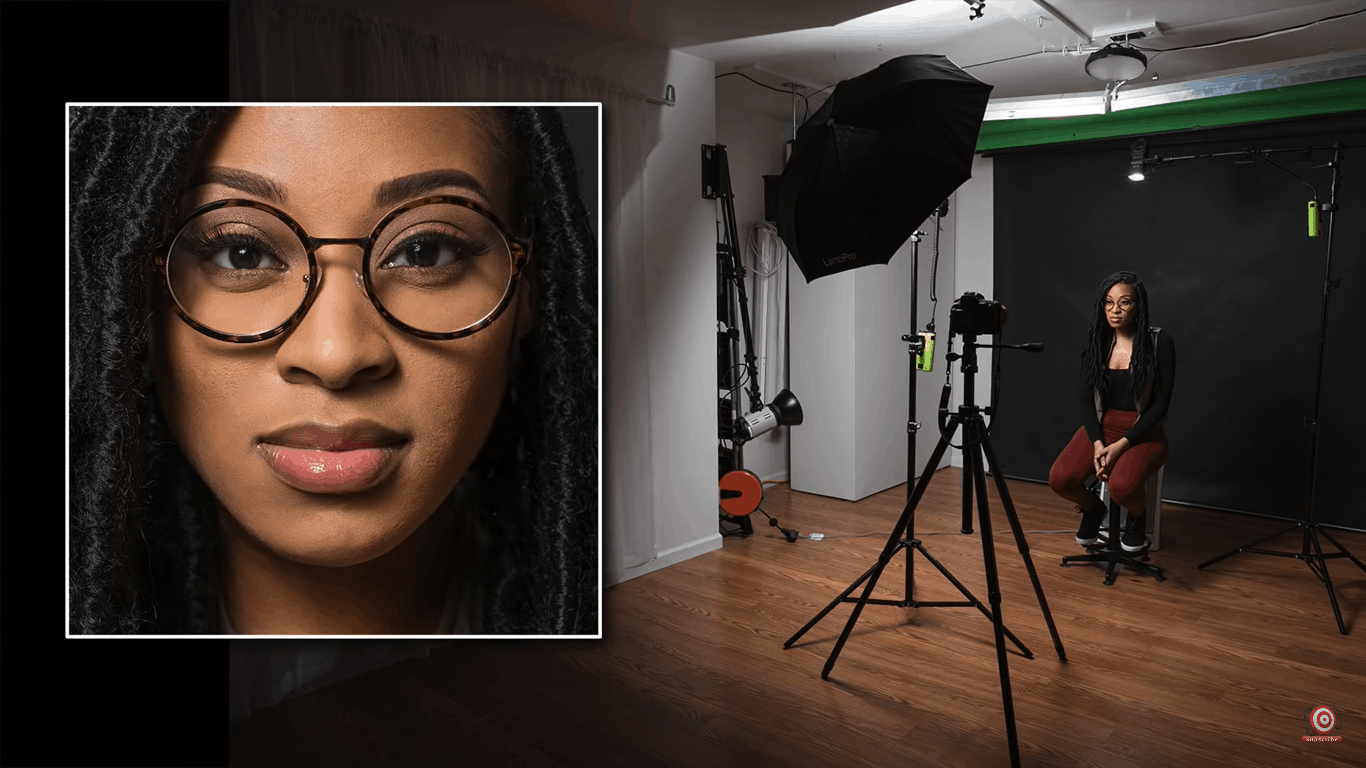
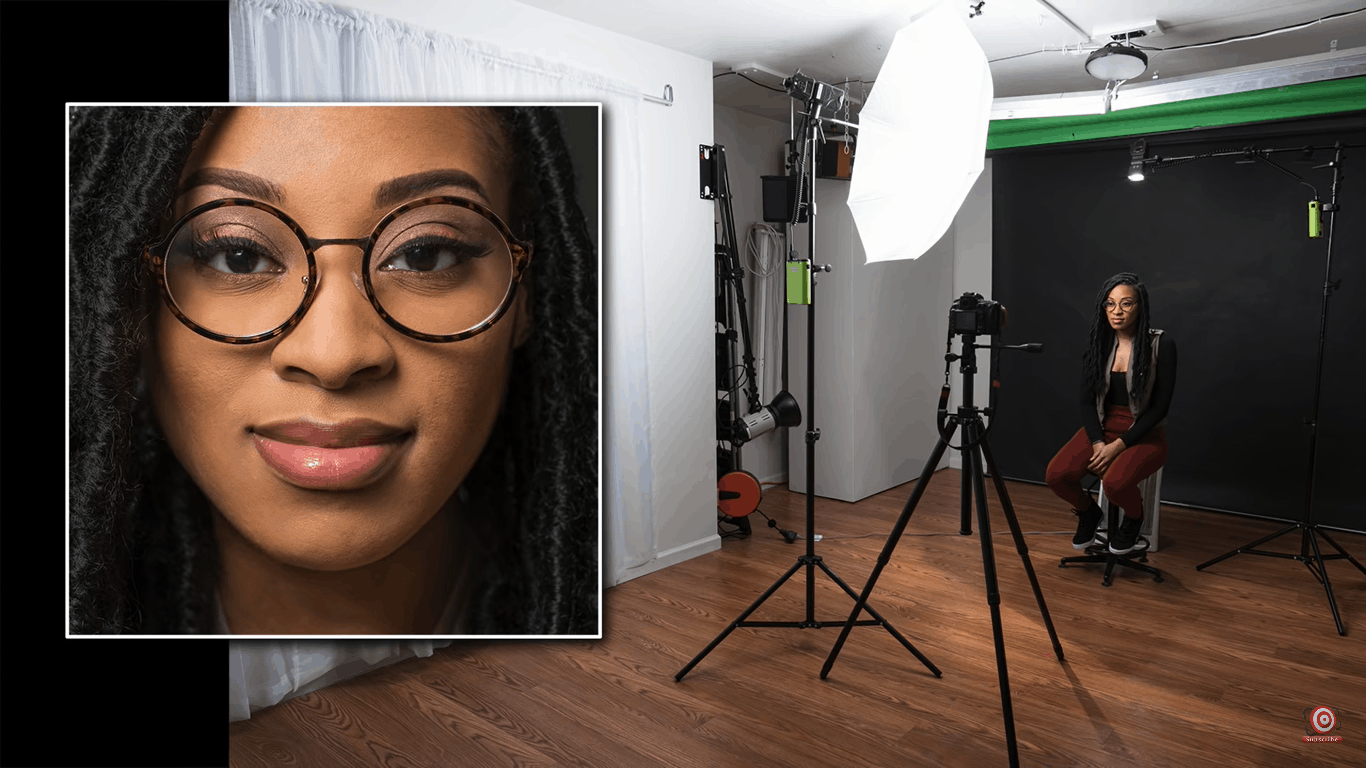
Here is the same lighting setup with a Wescott shoot-through umbrella set at 55”.
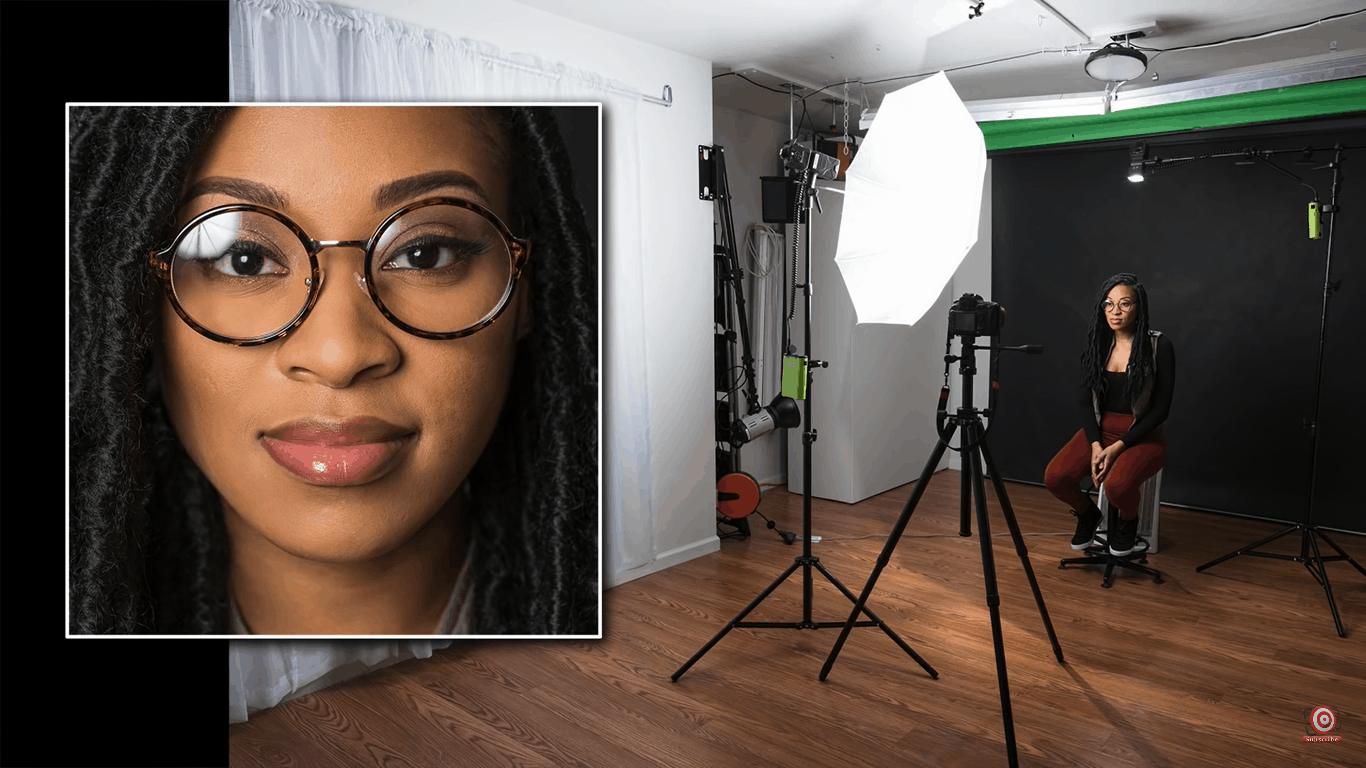
And then again at 74” — the glare problem is resolved.
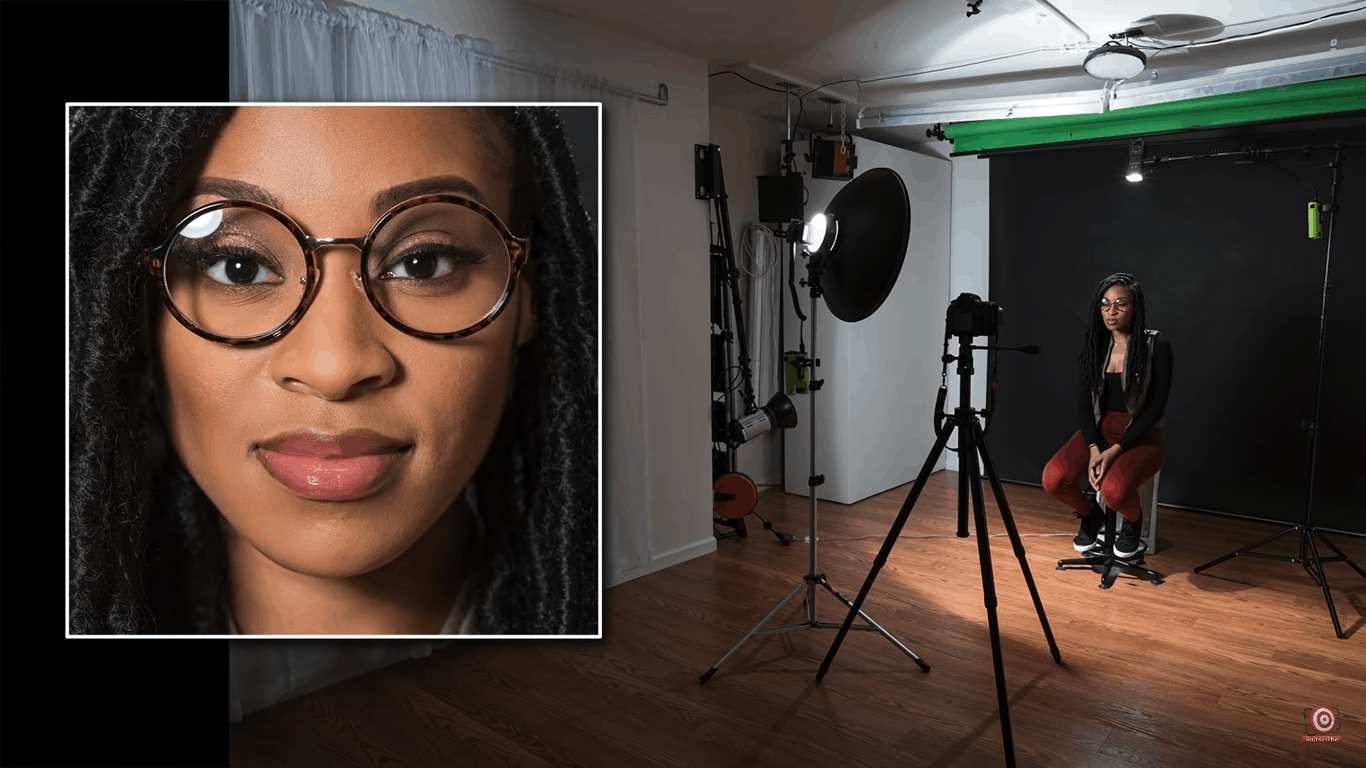
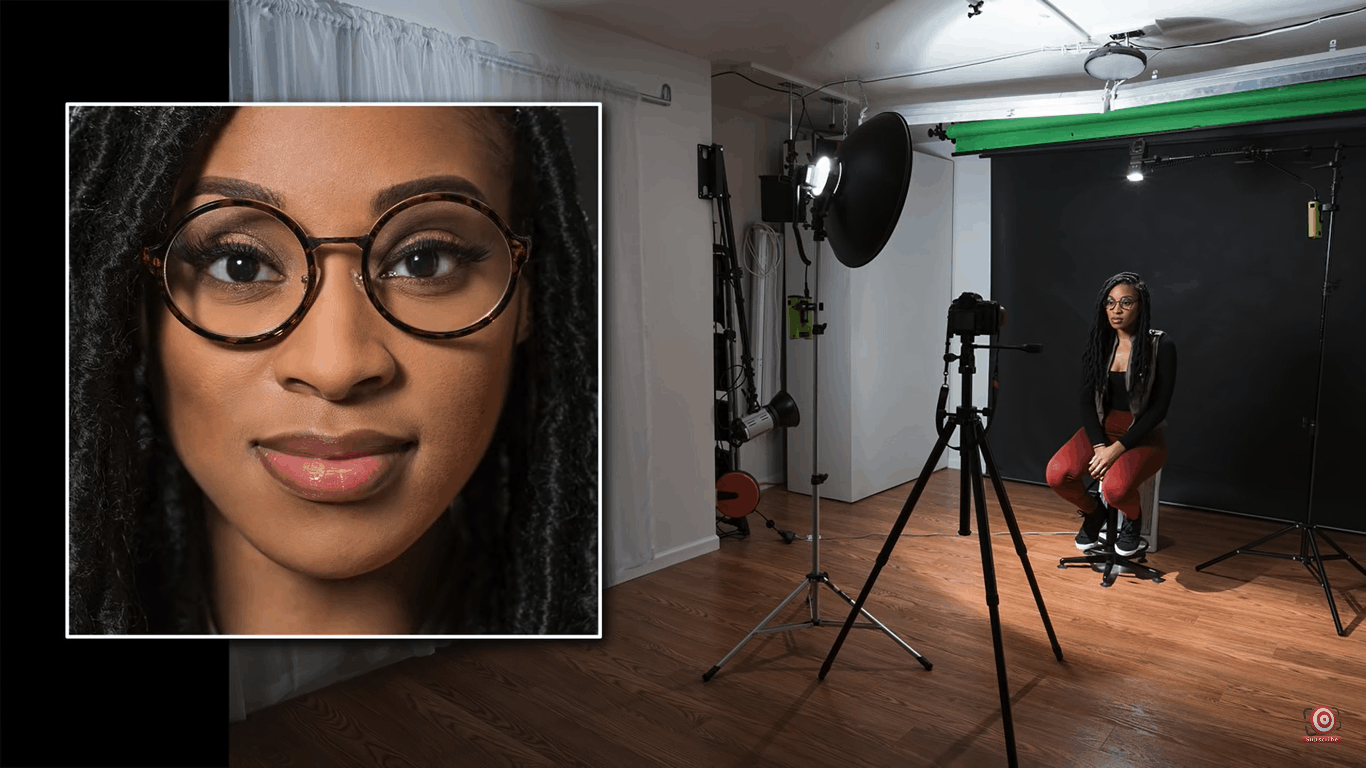
Here is a LumoPro 21” beauty dish set at 55” high — not so good.
And here is the same beauty dish at 74” high — problem solved.
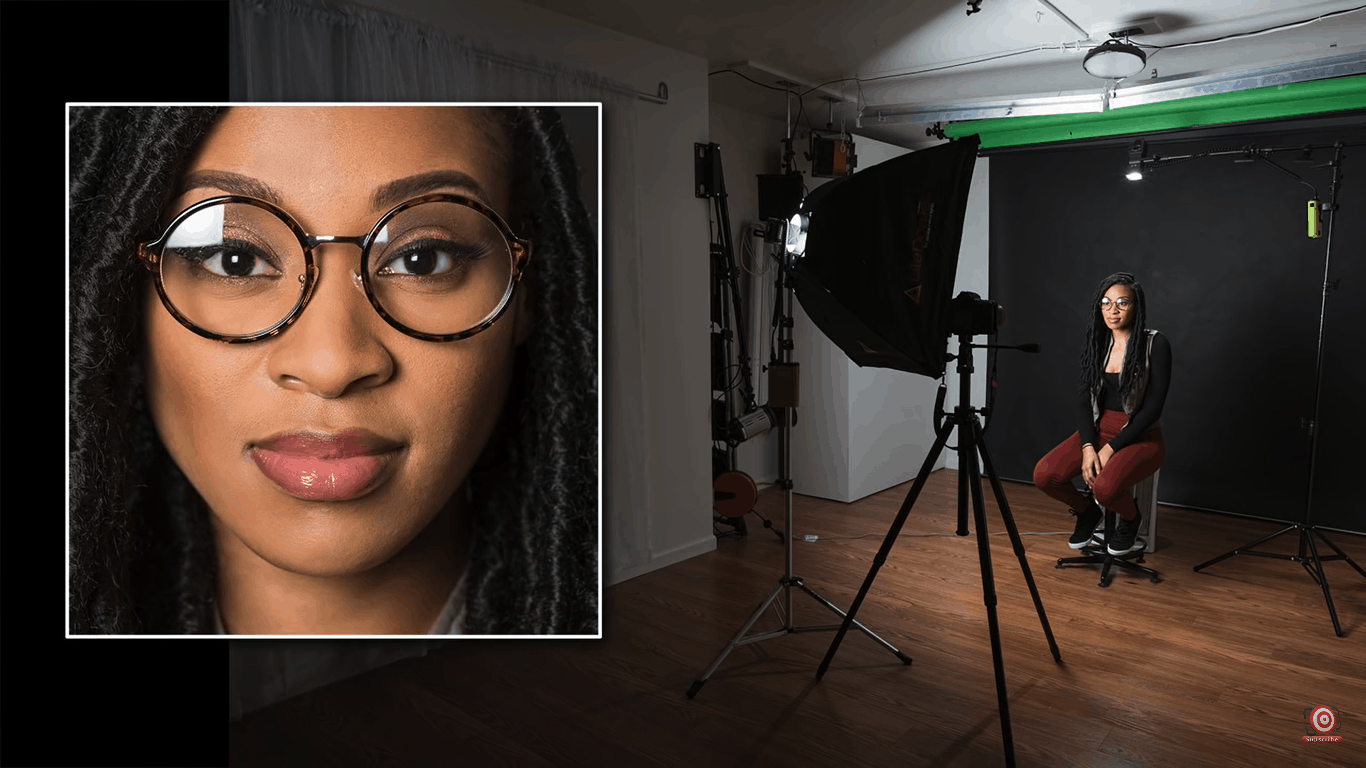
A medium-sized Photoflex softbox is in the vertical position at 55” and then again at 74”.
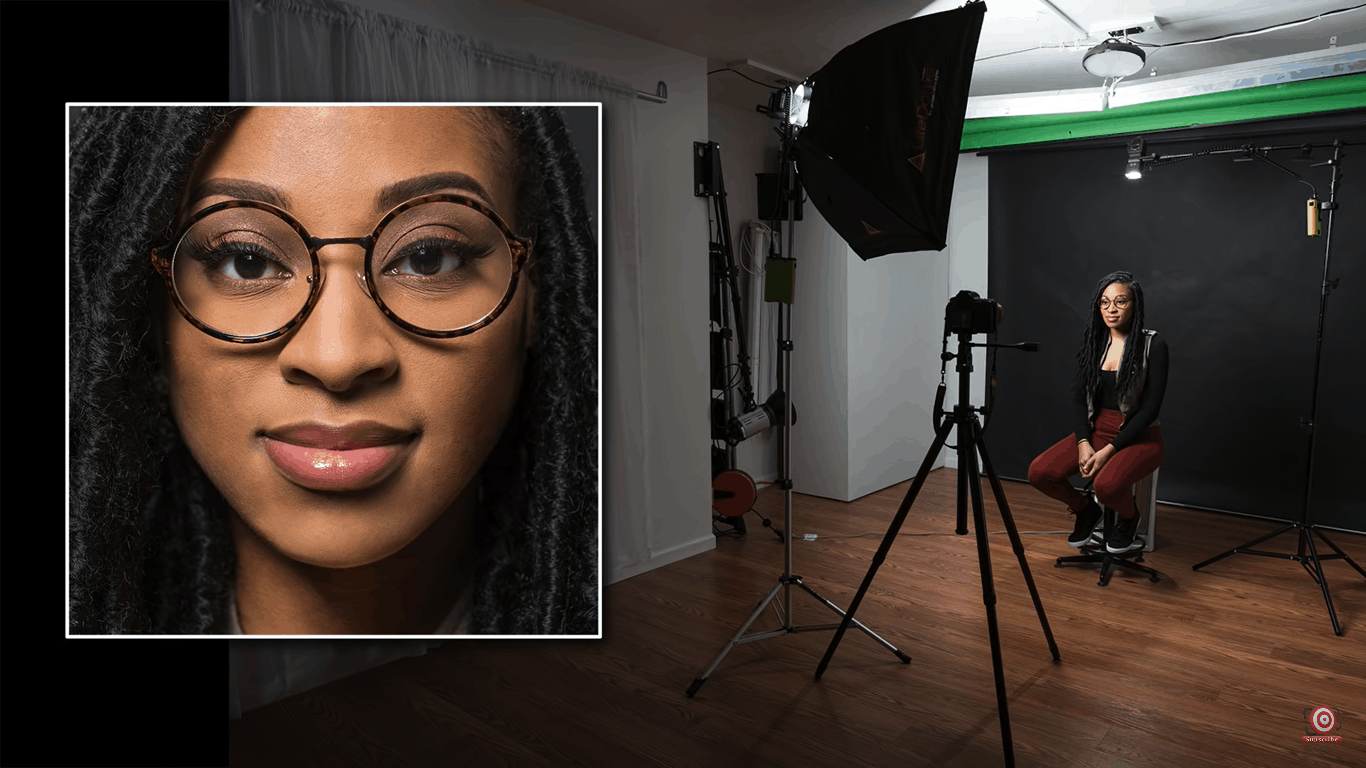
And there is always bounce flash, which is highly underrated but very effective. Below, the speedlight is about 8 feet (2.44 meters) in front of the subject and aimed at the white ceiling halfway between the flash and my model.
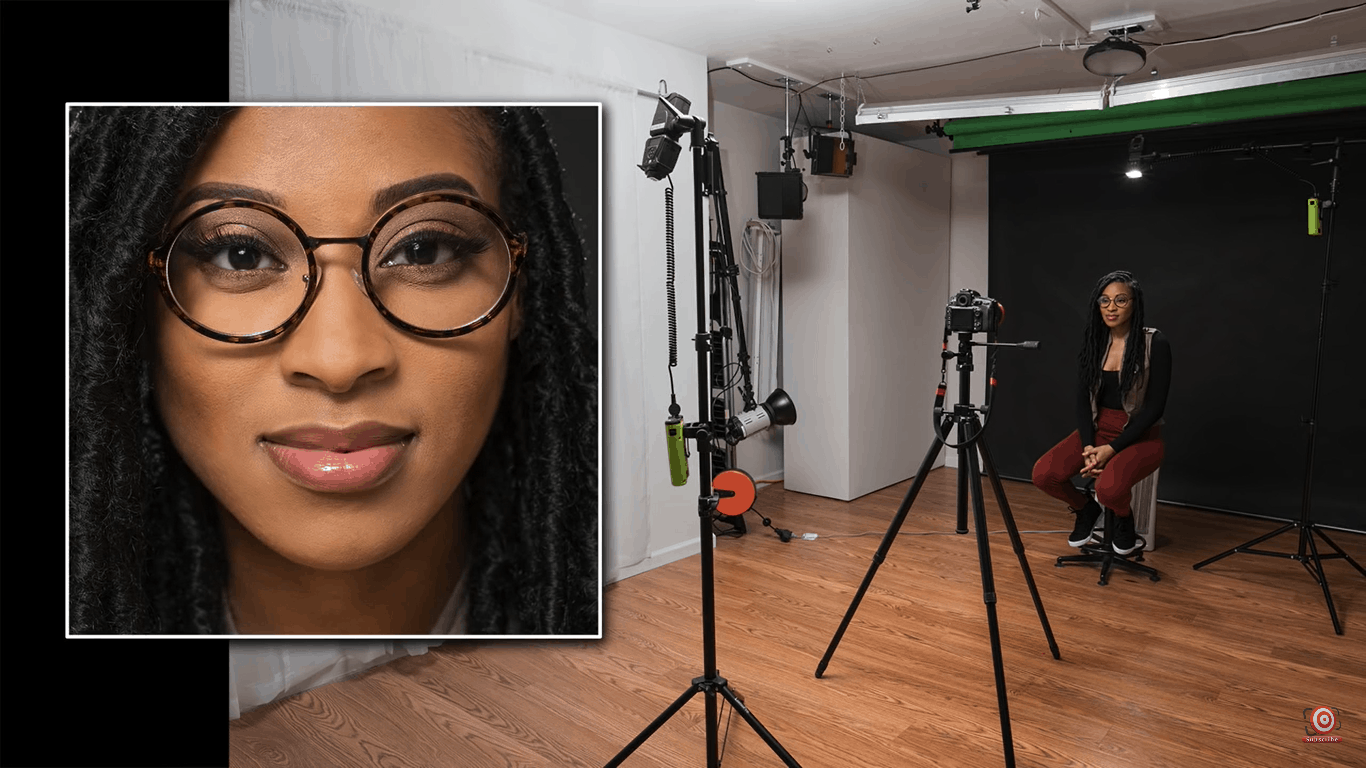
Here is a four-light set-up with two medium-sized softboxes in front and set at about 74” and two speedlights behind the subject simply aimed at the white wall.
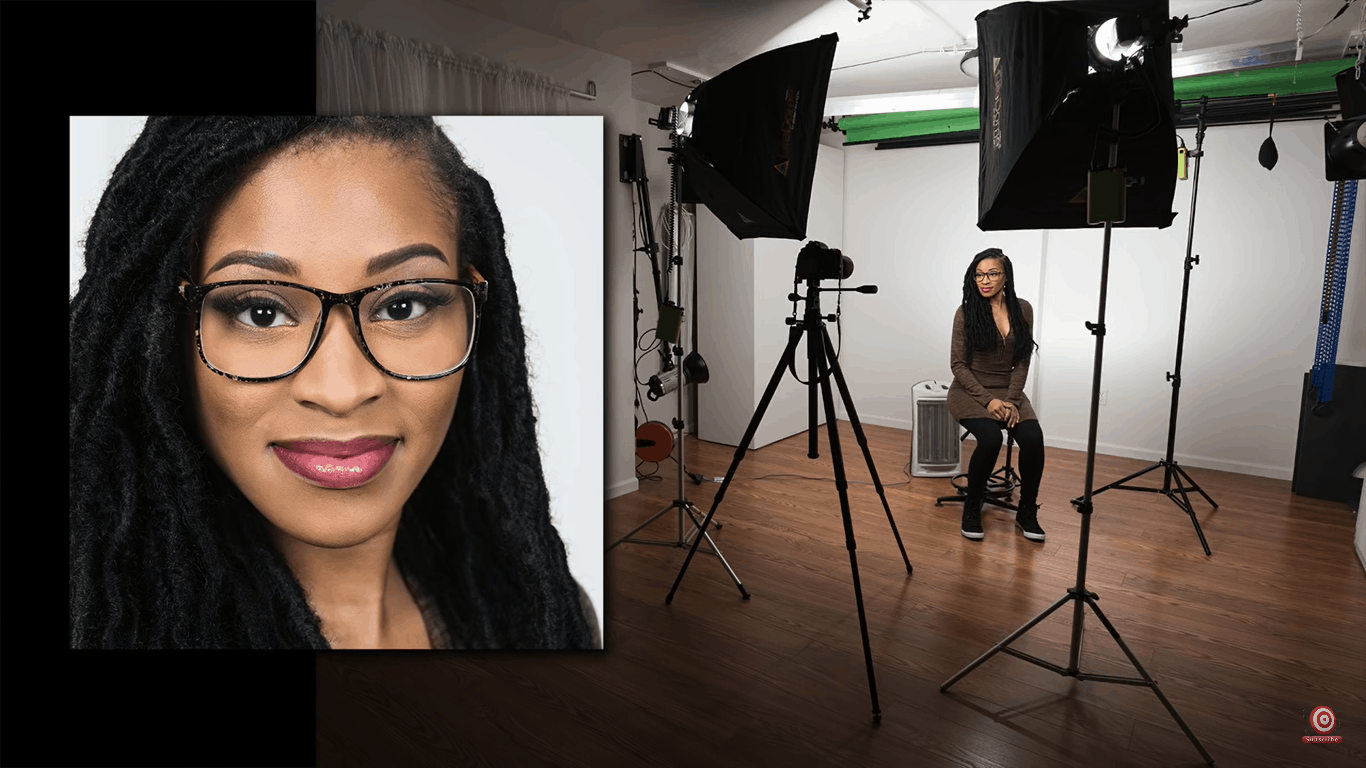
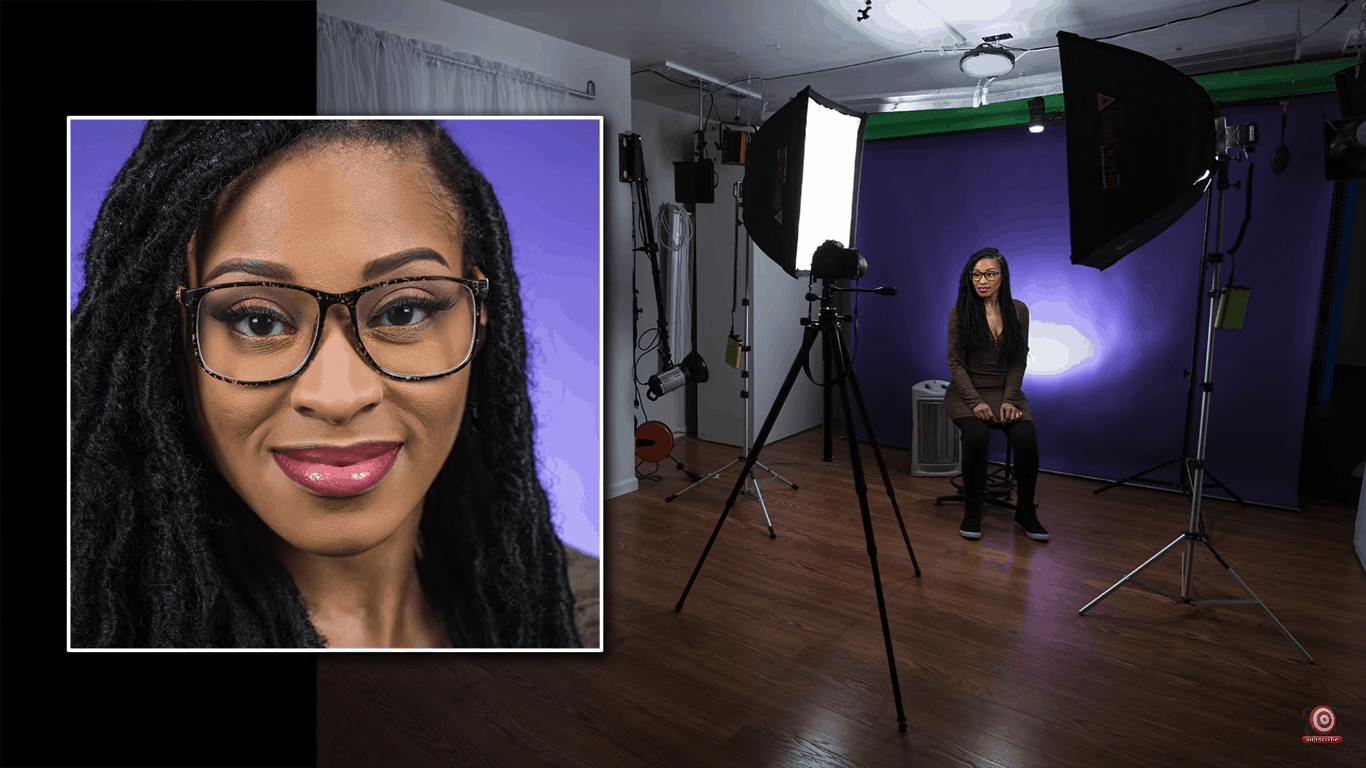
Here is a four-light arrangement: the medium-sized softboxes off to the side but slightly in front of the model, one speedlight on the floor to create the glow on the purple background, and one above and behind her for a hair light.
Here’s a three-light setup using a bounce flash as the main light, a speedlight with orange gels on the floor aimed at the black backdrop, and another speedlight above and behind as a hair light.
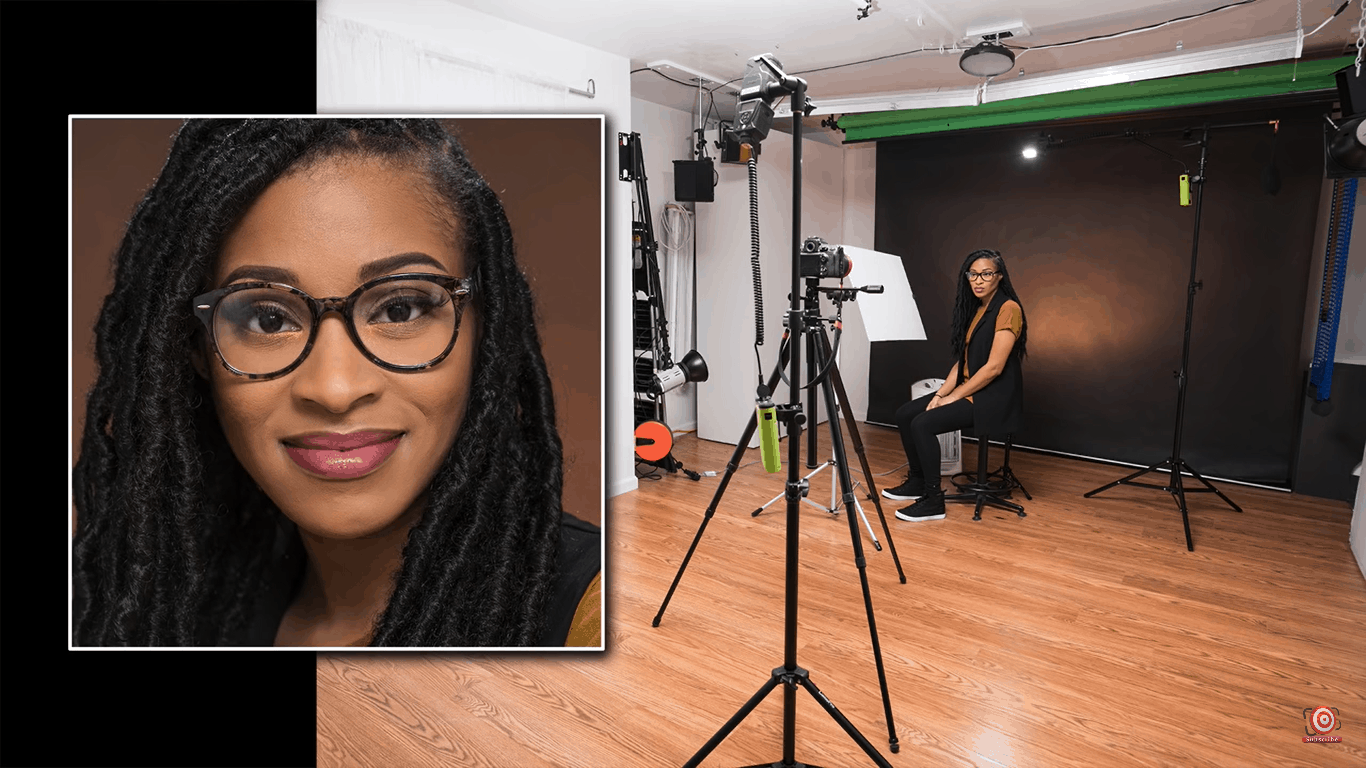
Hopefully, you will see that the possibilities are endless. There is no one right way to light a shot where you’re photographing people with eyeglasses, but you do NOT need tricks.
KISS IT Tip
If you set up your lights and take your test shots and realize you have glare, remember that since we are dealing with simple angles of reflection, the solution is most likely in one of three options. Most of the time, you will only need to change one of these things to solve the problem:
- The position or the angle of your light
- The position or the angle of your model or subject
- Your shooting position.
So keep it simple, change only one thing at a time, and take a test shot before you change anything else.
A Summary: The Dos and Don’ts of Photographing People with Glasses
The Don’ts of photographing people with glasses
- Don’t tilt glasses down. Have your subject wear their glasses properly.
- Don’t do all kinds of awkward head tilts or have your subject drop their chin to avoid your misplaced light. This is the best way to have your subject feel awkward, which means they will look awkward.
- Don’t move your lights too close to the camera lens. We all love catchlights and well-lit retinas, but the closer your light is to the camera lens the more likely it is that your lens will be in the angle of reflectance.
- Don’t panic – it’s just another problem to solve.
The Dos to avoid glare in glasses.
- Ask your subject if they prefer to wear glasses or not. If they don’t mind taking them off, your job just becomes easier.
- Ensure the glasses are pushed up on their nose and properly seated. Nothing is worse than a photo of someone with crooked glasses or glasses halfway down their nose.
- Explain to your subject that photographing people with glasses is tricky. You want to get the light just right so that they look their best.
- The easiest solution is to keep your lights high, above the glasses. But remember, that is not the only solution.
- If you like to work with short and broad light, remember that broad light is much easier than short light to avoid refraction on eyeglasses.
- Practice before you have to do it for real.
I hope you found this information useful. Now go pick up that camera and shoot something! Because – “Your BEST shot is your NEXT shot!” — Joe Edelman